
In this article, I will show some general points to make Ghost more compliant to the General Data Protection Regulation (GDPR). The GDPR is the European regulation on data privacy. Its objective is to give European citizens the control over their personal data. All companies that operate in the European Union, or that have websites available in the EU must comply to the GDPR. That means all bloggers running a Ghost website that is not blocked in the EU must comply.
After installing Ghost, it is probably not GDPR compliant, or at least may be in a legal gray area where you as a blogger may not be safe from adhortatory letters. In the following, I will talk about some things to consider when running a Ghost blog.
1) HTTP requests to CDNs
A content delivery/distribution network (CDN) serves the purpose of providing web assets such as image, JavaScript or CSS files. It is a global network of servers that picks a server near your location to serve the files faster. When you include a file from a CDN into your website you tell the user's browser to send a HTTP request for the file to the CDN. As a consequence, the user visiting your websites does not only visit your website hosted on the servers under your domain but also visits the servers of the CDN. The HTTP request that is sent contains data about the user that fall under the GDPR regime (such as the IP address). Therefore, you should omit any requests to CDNs completely, especially since they may sit outside of the European Union. There is no need to include CDNs at all.
So what are the requests to CDNs sent by your website? You can easily check that with any modern browser like Firefox or Chrome. In Firefox, there is the Page Inspector included in the Web Developer Tools and in Chrome, there is the DevTools. You can open both by right-clicking into your webpage and choose "inspect". It will open a window on the bottom or right side to your browser. Choose the "network" tab. Reload your page with F5 and it will show all HTTP requests sent.
On a freshly installed Ghost with Casper theme, you will see the following requests:
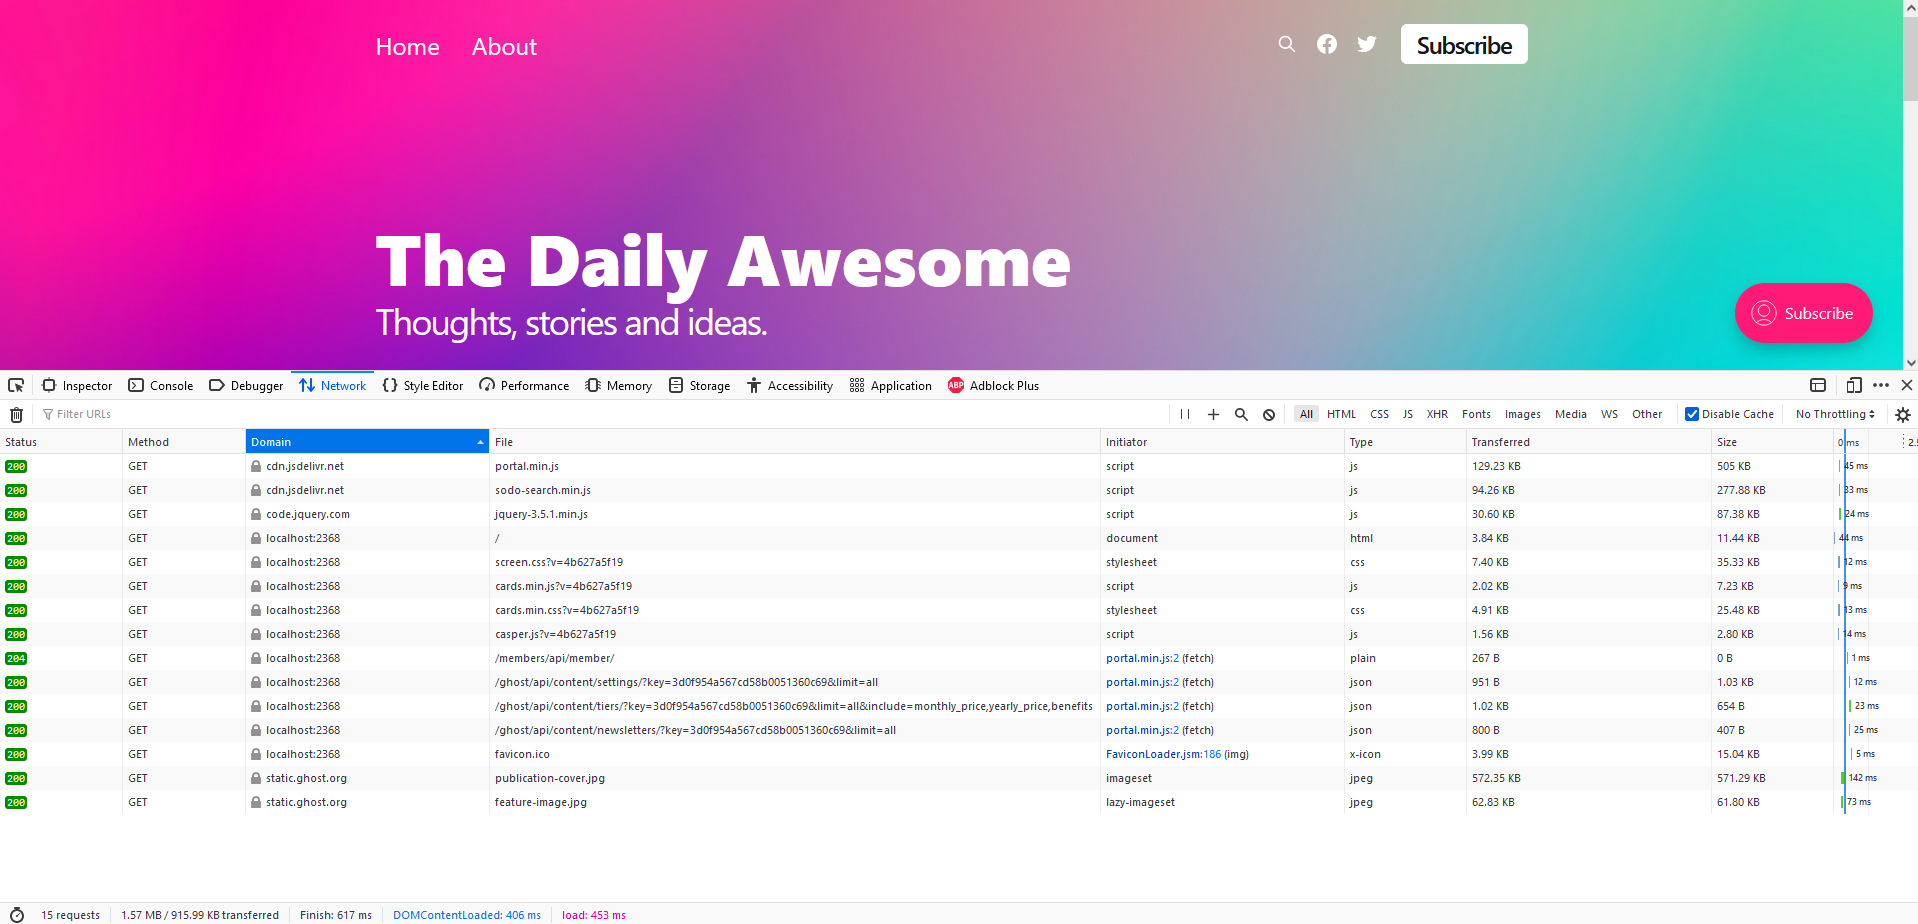
Ideally, this tab only shows requests to your own domain. In this case my domain is localhost:2368 as I am using a local environment. You can see that there are also requests to the domains cdn.jsdelivr.net (2x), code.jquery.com and static.ghost.org (2x). In the following, I will show how to get rid of all of them.
1.1) Requests to jsdelivr for portal and sodo-search
The Ghost developers chose to include the JavaScript code for the portal function (member sign-up and access) and the search function from the jsdelivr CDN. At least, they give you the option to host the files on your own server. To do that, just follow the requests to their URL. You find the URL in the Page Inspector by clicking on the requests. Remove the file name at the end to show the folders of the projects containing all files. Be careful, you may also want the .css files from the directories. Open the files in a new browser tab and download the files to your computer.
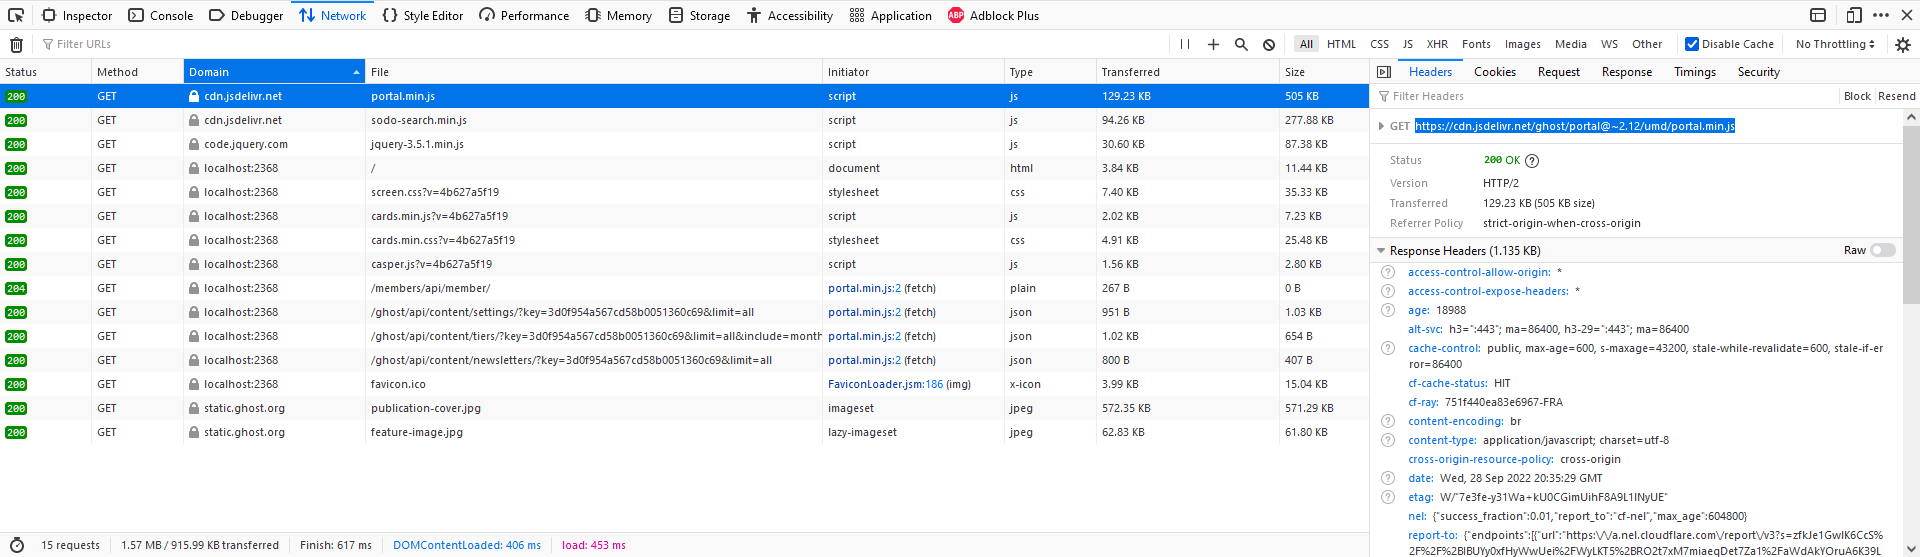
The files for the portal found at https://cdn.jsdelivr.net/ghost/portal@~2.12/umd/ should be:
- https://cdn.jsdelivr.net/npm/@tryghost/portal@2.12.0/umd/portal.min.js
Be careful to choose the right version for your Ghost version. Cross-validate with the requests sent by your Ghost installation. The files for sodo-search can be found at https://cdn.jsdelivr.net/npm/@tryghost/sodo-search@1.1.0/umd/ and should be:
- https://cdn.jsdelivr.net/npm/@tryghost/sodo-search@1.1.0/umd/main.css
- https://cdn.jsdelivr.net/npm/@tryghost/sodo-search@1.1.0/umd/sodo-search.min.js
After downloading all files, create a assets/jsdevlir directory in your theme. Place the files inside the directory. I renamed them to include the version number, so I can easily see the version of the files:
daniel@DESKTOP:~/ghost/content/themes/casper$ ls assets/jsdelivr/
portal-2.12.min.js  sodo-search-1.1.main.css  sodo-search-1.1.min.js
Next, we adjust the configuration file in the Ghost home directory named config.<environment>.json and add the settings for portal and sodo-search as follows:
...
  "sodoSearch": {
    "url": "/assets/jsdelivr/sodo-search-1.1.min.js",
    "styles": "/assets/jsdelivr/sodo-search-1.1.main.css"
  },
  "portal": {
    "url": "/assets/jsdelivr/portal-2.12.min.js"
  },
 ...
This will tell Ghost to load the files from our assets/jsdevlir directory in the active theme. You can upload the theme with the files we added to your Ghost production environment without problems. Just edit the production configuration and include the above settings.
After changing the configuration you may need to restart Ghost for the changes to be effective. After restart, the requests to the CDN cdn.jsdelivr.net should be gone for good.
cdn.jsdevlir.net as well. Please see the Ghost docs on the comments section to adapt your configuration.1.2) Requests to jQuery
jQuery is a very famous library for JavaScript that makes development with JavaScript easy. It became very famous around 2010ish when internet connections became fast enough to load bigger library files and people started to build fancy webpages with AJAX requests and all kinds of UI effects.
The jQuery library is loaded by the Casper theme, not the Ghost core itself. In default.hbs file you will find a <script> tag starting at line 89 that loads jQuery directly from code.jquery.com . Again, we could download the file from the URL stated there, just put it into a directory within our theme and include the local file. But I will take a cleaner approach, that is to manage the jQuery dependency using yarn. This will add jQuery to the package.json file and lock the version number. We can later easily change the version.
To add jQuery we run the following command from the Terminal within our theme directory:
yarn add jqueryNext, we need to add jQuery to our packaging. In gulpfile.js we add a new function, e.g. after the closing bracket of function js(done). The function tells gulp to copy the files from the node_modules folder into our assets/built folder:
function jquery(done) {
    pump([
        src('node_modules/jquery/dist/*.js'),
        dest('assets/built/', {sourcemaps: '.'}),
        livereload()
    ], handleError(done));
}
Change the line 95 const build = series(css, js); to include the jquery function we just created before js:
const build = series(css, jquery, js);Finally, we can change the <script> tag that loads the jQuery files in default.hbs to:
<script src="{{asset "built/jquery.js"}}"></script>Run the command yarn build on your theme and maybe restart Ghost. Afterwards, the request to the jQuery CDN should be gone but your jQuery should still work.
1.3) Requests to static.ghost.org
The requests just catch the files publication-cover.jpg and feature-image.jpg from the Ghost servers. In your Ghost Admin > Settings > Design > Brand change the "publication cover" by either deleting it or replacing it with your own file (you could also download the file from the Ghost servers to your computer and upload it again). Save the changes. Then the request for publication-cover.jpg should be gone.
For feature-image.jpg you have to navigate to the default post titled "Coming soon" and delete or replace its feature image and save the post, or delete the post altogether. Then the request for feature-image.jpg should be gone as well.
Please do not replace any of the images with an image from Unsplash. Never place any image from Unsplash in your content using the integration provided by Ghost. I will talk about this in the next section.
2) Embeds
When writing blog posts, Ghost allows you to easily embed any content. May it be a photo from Unsplash as feature image or content image, a YouTube video or a Twitter posts. This is all bad.
The Unsplash photos may be the lesser evil here. When you include a photo from Unsplash using the integrated function provided by Ghost it will link to the file on the Unsplsh server. So you are basically in the same situation as with the CDNs. You load file from an external server which exposes the user's data such as his IP address. As a workaround just browse Unsplash.com or Pexels.com by yourself, download the image files and upload them using the provided upload function. And of course, place the author credit by yourself.
Other embeds such as YouTube, Instagram, Twitter, Vimeo, etc. are even worse. They usually embed JavaScript in your webpage. You have absolutely no control what the JavaScript is doing. It may create its own tracking cookies so the user may be tracked across hundreds of webpages. E.g. a YouTube embed will send requests to several Google servers (even if you opt for the enhanced privacy) and create several cookies. As a workaround, you can upload your own cover image for a video and link that cover image to the video link. That way the user has to click on the cover image to explicitly leave your page. That way, you give back control to the user. In the best case, you put a hint in the image description below the image that the user will leave your page and be redirected to YouTube.
3) Code injections
One of Ghost's philosophies is that there are no plugins. Opposed to WordPress, where you kinda have to install a dozen of plugins to get the features you may need.
The WordPress way – adding plugin after plugin – is bad because you cannot really control the source code of the plugins. They may introduce CDN requests or other tracking features that may not be GDPR compliant. WordPress' own plugin JetPack is a good example.
The Ghost way relies on the injection of code. If you look at the Ghost integration page, the recommended way for integrations is almost always code injection. You can inject code globally for all your Ghost pages via Ghost Admin > Settings > Code Injection, or on each post or page separately.
As said when I talked about embeds before, code injections may introduce any JavaScript code to your page that you cannot control as site administrator. It may change from one day to another. So you have to keep track of changes to the injected code. And the code may create tracking cookies and send several requests. When you go for any code injection, you need the user to opt-in, i.e. ask the user for permission to load the code. You can achieve that using a cookie consent (I will talk about that in the next section). Plus, you need to disclose and write about the injection and the cookies used in your privacy policy and provide an option for the user to opt-out again. So better to omit any injections at all.
4) Cookie consent
You need to inform your user about the cookies used on the website and get a opt-in for any cookies that are not essential. Essential cookies may be for example the cookie for the Ghost session ID. Without the cookie certain features of your Ghost site would break and the website may not work as expected. All other cookies like analytics cookies (I will talk about user behavior analytics in the next section) or any embed or injection cookies like YouTube etc. are non-essential. The user needs to opt-in for these non-essential cookies.
There are some well-developed libraries for cookie consents available. I went with orestbida/cookieconsent. You can see demo projects on the homepage. To add this library to your Ghost theme, run the following yarn command from the Terminal within your theme directory:
yarn add vanilla-cookieconsentThis will add a dependency to the library via the package.json file. Adapt your gulpfile.js and add a function to add the new dependency to the package resulting from the gulp build process:
function cookieconsent(done) {
    pump([
        src(['node_modules/vanilla-cookieconsent/dist/*.js',
        'node_modules/vanilla-cookieconsent/dist/*.css']),
        dest('assets/built/', {sourcemaps: '.'}),
        livereload()
    ], handleError(done));
}
Again, as with jQuery, change the line const build = series(css, js, ...); to include the cookieconsent function we just created:
const build = series(css, jquery, js, cookieconsent);Next, add the script tag in default.hbs on line 89 before jQuery:
<script src="{{asset "built/cookieconsent.js"}}"></script>As a last step, we need to initialize the cookieconsent library. For that we create a new JavaScript file in our theme in the assets/js directory and name it cookieconsentinit.js. The name does not matter much, it will be compiled together with all other files in the assets/js directory into the casper.js file. We just create a new file so that we as theme developers have it separated from other stuff. In the new file assets/js/cookieconsentinit.js call the function to initialize the library with your parameters:
// obtain plugin
var cc = initCookieConsent();

// run plugin with your configuration
cc.run({
  // your parameters here ...
});
You can obtain a default configuration from the "As external script" toggle on the documentation page for installation and usage. After adding the files, run yarn build and restart Ghost. Then you should see the cookie consent popping up on your page.
5) User behavior analytics
To build a successful website, any website owner loves to collect data about the user behavior on their page. The most famous analytics tool is Google Analytics. But it is really hard to make Google Analytics compliant to the GDPR – I will not talk about that here. I suggest to host an instance of Matomo (formerly known as Piwik) on your own web servers. Matomo is easily installed in some minutes. After installation, you should change some privacy settings in Matomo to make it GDPR compliant. Again, I will not talk about that here. Instead, Matomo provides some great resources regarding privacy.
You may want to include the MATOMO_SESSID cookie into your cookie consent from the last section. Also, you need to disclose what data your are collecting, what purpose it serves, etc. in your privacy statement. Last but not least, do not forget to provide the option to opt-out.
6) Privacy policy statement
You should add a privacy policy statement to your website and link to it e.g. in your footer. To put it short, the privacy policy should state what data your are collecting, what purpose it serves, how you handle the data and how the user can control the data. You can use your privacy policy generator of trust. However, you should always consult a lawyer with expertise regarding data protection to make sure your privacy policy, and your Ghost blog overall is GDPR compliant.
7) Ghost access logs
This part is one you can easily overlook. Ghost is using a nginx web server to serve its pages via HTTP. Usually, every web server is generating access log files that contain HTTP request header information (for example the IP address) from the users visiting your page. The nginx web server behind your Ghost page is indeed doing that. The log files can be found in ghost/content/logs/ :
- A
<site>_<environment>.error.logthat contains all errors that may occur in your Ghost instance. - A
<site>_<environment>.logthat contains the access log with all visits to your Ghost pages.
Yet, I did not find a way to turn off the logs. According to the configuration documentation on logging, you can change the log level. I tried to change the log level to error only but it still generated the access log. As a workaround, you can delete the logs with a server-side cronjob that periodically deletes the files. You may want to do that anyway as the files may grow in size depending on your site's traffic. At least, you have to inform about the logging in your privacy statement.